Last April 6, we celebrated Lia’s post-first birthday Ballerina bash. I crafted a handful of ballerina DIYs for this chaotic momentous event, one of which was a ballerina tutu wreath.

This is a pretty easy though time-consuming project (took me about 4 to 5 hours to complete an 8-inch wreath); all it took were a few Pinterest references, some materials sourced online and in local ukay-ukays, love and voila! Wreath done.
Here are the materials you’ll need:
 |
| A wreath. I chanced upon this wooden Halloween wreath in an ukay-ukay in Kamuning for only P20!. In other parts of the universe (obviously not here, because you could never find a wreath here), you may find straw ones in crafts and hobby stores. |
 |
| Glue gun. |
 |
| Satin lace ribbon (at least 1″ wide) to cover your wreath. I used about 10, 12 yards for the 8-inch wreath I have. |
 |
| A spool of 6″ pink tulle.I only used up only about 20, 25 yards for my wreath. If you have a bigger wreath, you’ll probably gonna need more. Bought this from an online seller on Facebook, Mom & Me Bows, for P9/yard. |
Stuff to adorn your wreath with:
There’s really no hard rules on what to use.
Go wild with your imagination!
This is a ballerina wreath though, so I used related ornaments like:
 |
| Lia’s ballet flat. The other piece got lost during our Corregidor trip, so I decided to put the other one to use. |
 |
| A feathered hair accessory. |
 |
| A figurine with a butterfly wing. |
Now, onto the meaty portion: The hows.
1. I removed all Trick or Treat designs from the wreath, so what’s left is the base.

2. I also readied the ornaments for the wreath by carefully detaching them from the source.
 |
| This is the centerpiece of that feathered hair accessory. Then, I detached the wings from the figurine and used a glue gun to attach the wing on the centerpiece.  |
3. Cover the wreath with a satin lace. Begin by attaching one end with a glue gun, then simply work your way around till the entire wreath is covered with lace.

4. Cut up 20-inch pieces of tulle. I used around 55 to 60 to cover the entire wreath. The more pieces you have, the more knots you can do, and the fuller-looking the wreath would be.

5. Make a knot using the strips of tulle you have, following this knot (I found it to be the simplest one to make, the easiest to move around – especially when you’re placing the knots closer together – and the easiest to untie).


Bring the two ends (should be of same length) inside the loop at the center, and simply pull the ends up until the knot is tight and secure.


It should look like this when finished.
6. Once you’ve covered the entire wreath, you would want to push the knots closely together to make it look fluffier. Add more strips and knots as necessary.

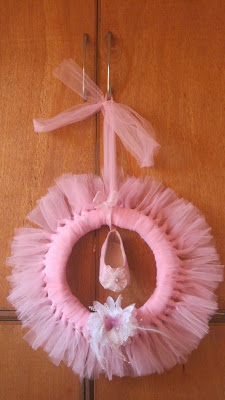
7. To finish it off, I tied the ballet flat at the center of the wreath using its shoe lace, then attached the feathered hair accessory with the angel wings on the wreath, just below the shoe. Also, I looped a 30-inch tulle for hanging.

8. Trim the ends of the tulle as necessary.
9. You now have a ballerina tutu wreath!
This also works for other themed wreaths. I might use the Halloween ornaments next time.
And for a first-time tutu wreath, it ain’t that bad, eh?